Photo by Elliot Parker / Unsplash

Intro to Helm Charts for Complete Beginners

Jubril Oyetunji
Jubril Oyetunji

Table of Contents

In the early days of Kubernetes, the standard way to distribute and deploy cloud native applications on Kubernetes was through YAML manifests. These manifests are files that define the desired state of various Kubernetes resources, such as Deployments, Services, ConfigMaps, and Secrets. However, managing these manifests can quickly become cumbersome and error-prone, especially for complex applications with multiple dependencies.

The concept of package management, which is widespread in other domains like operating systems and programming languages, was not initially available for Kubernetes until Helm. Helm made it easier to consistently install, upgrade, and manage the lifecycle of applications on Kubernetes.

In this post, we'll delve into the use cases of Helm and its core components and guide you through creating Helm charts alongside how to host them. We'll finish by discussing when and when not to use Helm.

What is Helm?

Widely regarded as the package manager for Kubernetes, Helm is an open source project that introduced the concept of package management to the Kubernetes ecosystem. It provides a packaging format called "charts" that bundles all the necessary Kubernetes resources and configurations required to run an application.

Why Should You Use Helm?

With an understanding of what Helm is, here are a couple of reasons why you should consider using Helm:

  • Simplifies Application Deployment: With Helm, you can deploy complex applications to Kubernetes clusters with a single command. It abstracts away the complexities of managing multiple Kubernetes resources.
  • Reusability and Modularity: Helm charts can be shared and reused, allowing you to build complex applications from modular components.
  • Enables Repeatable Deployments: Helm charts define the desired state of an application, ensuring that deployments are consistent and repeatable. This is particularly useful in scenarios where you need to deploy the same application across different environments (e.g., development, staging, production).
  • Supports Version Management: Helm tracks and manages application versions, making it easy to roll back to a previous version if necessary. This is crucial for maintaining application stability and facilitating rollbacks in case of issues.
  • Provides Dependency Management: Helm charts can depend on other charts, allowing you to build and manage complex applications that rely on multiple interdependent components. This helps streamline the deployment process and ensures that all required dependencies are installed and configured correctly.

How does Helm work?

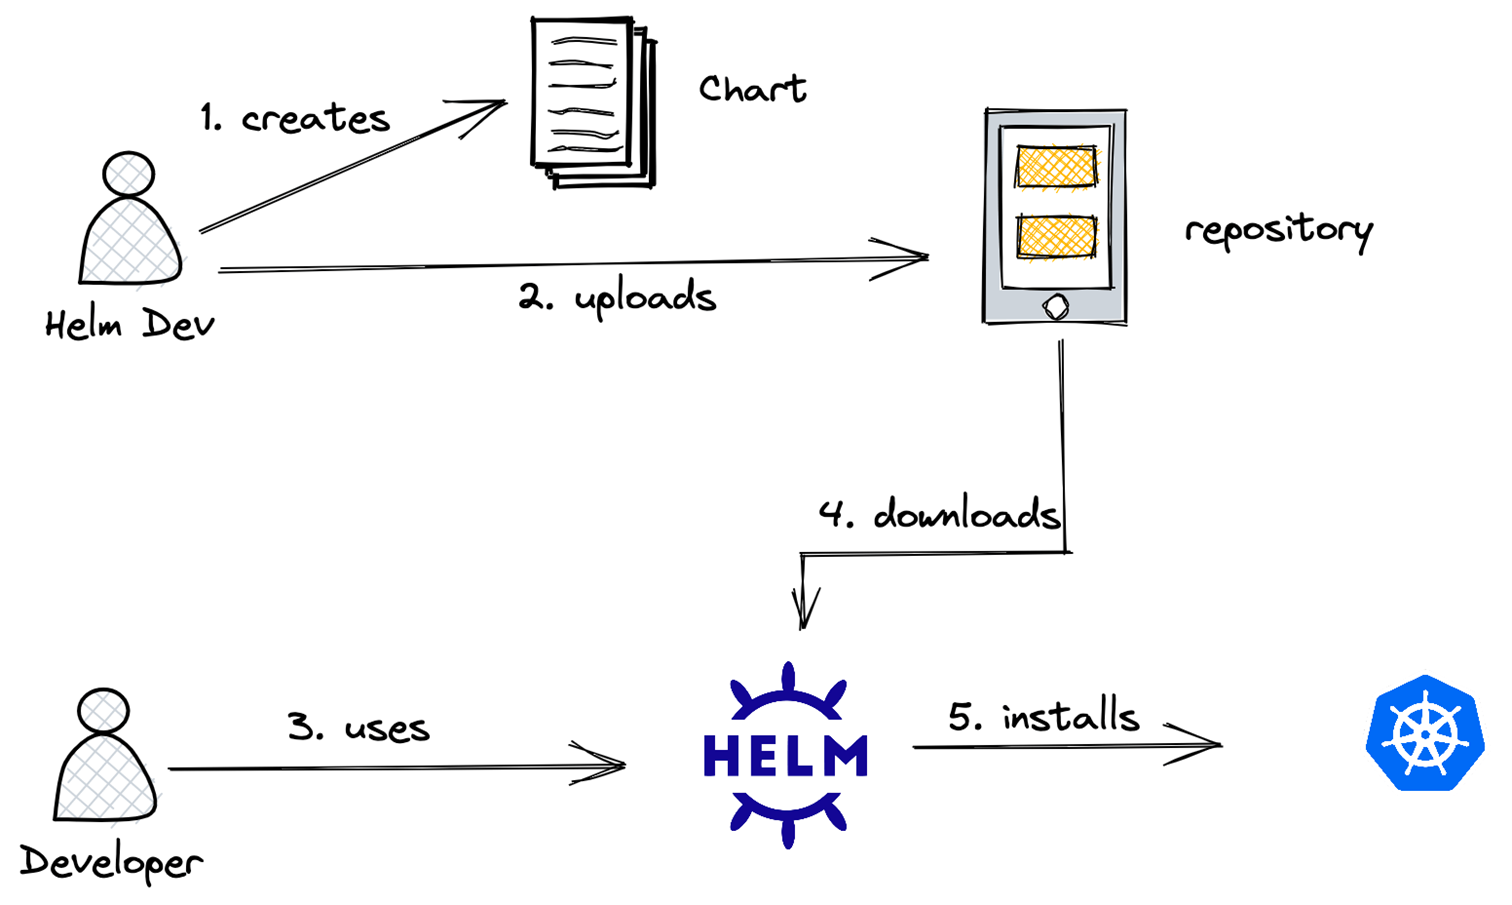
Helm Tutorials: What is Helm & How it works? - DevOpsSchool.com

At its core, Helm is a command-line tool that interacts with the Kubernetes API server to manage application deployments. The foundation of Helm's functionality lies in its use of charts. Charts are collections of files that describe Kubernetes resources, and they can be created from scratch or obtained from public or private repositories.

Helm supports various types of chart repositories, allowing you to share and distribute charts easily. These repositories can be local directories, remote HTTP/S servers, or cloud-based storage solutions. When you install a chart, Helm creates a release, which is an instance of that chart running in a Kubernetes cluster. Helm tracks the lifecycle of each release, enabling easy upgrades, rollbacks, and uninstallations.

Prior to Helm 3, Tiller was a server-side component that interacted with the Kubernetes API server to manage releases. In Helm 3, Tiller was removed, and its functionality was integrated into the Helm client. One of Helm's key features is its ability to customize chart deployments by providing values during installation or upgrade. These values can override default configurations defined in the chart, enabling flexibility and adaptability.

Additionally, Helm supports hooks, which are scripts that can be executed at specific points during a release's lifecycle, such as before or after installation, upgrade, or deletion. Hooks enable you to perform custom actions as part of the deployment process. Helm uses a templating engine called Go templates to render the Kubernetes manifests based on the chart's templates and the provided values, allowing for dynamic configuration and parameterization of resources.

Finally, Helm tracks the revision history of each release, making it easy to upgrade to a newer version of a chart or roll back to a previous revision if necessary. This feature ensures a smooth and controlled application lifecycle management process.

Configs and Releases

Releases and configs play a crucial role in Helm's ability to manage application deployments in a consistent and flexible manner.

Configs
Helm uses a configuration file format called values.yaml to customize and parameterize chart deployments. The values.yaml file contains key-value pairs that define various configuration options for the chart. These configurations can be overridden at install or upgrade time, enabling flexibility and adaptability.

Releases
In Helm, a release is an instance of a chart deployed to a Kubernetes cluster. Helm tracks and manages each release, allowing you to perform operations such as upgrades, rollbacks, and uninstallation."

How to Create a Helm Chart

Creating a Helm Chart is a relatively straightforward process, if you haven’t already you will need to install the Helm CLI, within your terminal run the following command to install Helm CLI.

Install Helm CLI

curl https://raw.githubusercontent.com/helm/helm/main/scripts/get-helm-3 | bash

Additionally you would need a Kubernetes cluster running locally. Here are a few options if you don’t have one already

Create a Chart Directory
Create a new directory for your chart using the helm create command:

helm create helm-experiments && cd helm-experiments

This command will create a directory named helm-experiments with a basic chart structure and a set of files.

The helm-experiments directory will contain several files and subdirectories:

  • Chart.yaml: This file contains metadata about the current chart, such as the name,  chart version, and description.
  • values.yaml: This file defines the default configuration values for your chart.
  • templates/: The templates directory contains the template files for your Kubernetes manifests (e.g., Deployments, Services, ConfigMaps).
  • charts/: This directory stores chart dependencies if your chart relies on other charts.

To keep this demonstration simple, we would need to remove some of the generated files Helm created, in your terminal run the following commands:

rm templates/hpa.yaml templates/ingress.yaml templates/serviceaccount.yaml

Helm generated manifests for a HorizontalPodAutoscaler ,  an ingress as well as a service account, which we would not be needing for this demonstration.  If this fits your use case feel free to leave them.

At this point, your folder structure should look something like this:

.
├── Chart.yaml
├── charts
├── templates
│  ├── _helpers.tpl
│  ├── deployment.yaml
│  ├── NOTES.txt
│  ├── service.yaml
│  └── tests
│     └── test-connection.yaml
└── values.yaml

Next, let’s change the default values helm generated, in your editor of choice open up values.yaml  , it should look something like this:

# Default values for helm-experiments.
# This is a YAML-formatted file.
# Declare variables to be passed into your templates.

replicaCount: 1

image:
  repository: nginx
  pullPolicy: IfNotPresent
  # Overrides the image tag whose default is the chart appVersion.
  tag: ""

imagePullSecrets: []
nameOverride: ""
fullnameOverride: ""

serviceAccount:
  # Specifies whether a service account should be created
  create: true
  # Annotations to add to the service account
  annotations: {}
  # The name of the service account to use.
  # If not set and create is true, a name is generated using the fullname template
  name: ""

podAnnotations: {}

podSecurityContext: {}
  # fsGroup: 2000

securityContext: {}
  # capabilities:
  #   drop:
  #   - ALL
  # readOnlyRootFilesystem: true
  # runAsNonRoot: true
  # runAsUser: 1000

service:
  type: ClusterIP
  port: 80

ingress:
  enabled: false
  className: ""
  annotations: {}
    # kubernetes.io/ingress.class: nginx
    # kubernetes.io/tls-acme: "true"
  hosts:
    - host: chart-example.local
      paths:
        - path: /
          pathType: ImplementationSpecific
  tls: []
  #  - secretName: chart-example-tls
  #    hosts:
  #      - chart-example.local

resources: {}
.....
autoscaling:
  enabled: false
  minReplicas: 1
  maxReplicas: 100
  targetCPUUtilizationPercentage: 80
  # targetMemoryUtilizationPercentage: 80

nodeSelector: {}

tolerations: []

affinity: {}

Edit the manifest so it looks like this:

replicaCount: 2

image:
  repository: traefik/whoami
  tag: "latest"
  pullPolicy: Always

service:
  name: whoami-svc
  type: ClusterIP
  port: 80
  targetPort: 80

In the updated manifest we set the replicaCount to two, next we set the image repository tag and pull policy. After that, on lines 8-12 we define the service name, type and ports, this is where helm’s templating comes into play as we can have different service types for each environment,  as an example,  for development we could have the service be of type ClusterIP and in Q/A or prod the service can be exposed as LoadBalancer.

Templating in Helm
One of the key features that makes Helm so useful is its use of templating. Helm uses the Go template language to generate Kubernetes manifest files dynamically during installation and upgrade operations.

Go templates provide advanced logic, iterations, conditionals, and more - making it easy to parameterize Kubernetes configurations. For example, templating allows you to inject certain values into your manifests only if specific conditions are met.

The template files reside in the templates/ directory of a Helm chart. Helm will combine these templates with the values.yaml file and render the final manifests to be deployed.
Some useful Go template directives used in Helm charts include:

  • {{ .Values.key }}: Inject a value from values.yaml
  • {{ .Release }}: Insert metadata about the release
  • {{- if .Values.key }}: Evaluate conditional blocks
  • {{- range }}: Iterate over collections

Since Go templates are compiled into the Helm binary, rendering is fast. This allows Helm to generate customized manifests quickly.

Creating a Deployment

With our desired values created we can shift our attention toward the deployment manifest, currently the helm generated manifest should look something like this:

#templates/deployment.yaml
apiVersion: apps/v1
kind: Deployment
metadata:
  name: {{ include "helm-experiments.fullname" . }}
  labels:
    {{- include "helm-experiments.labels" . | nindent 4 }}
spec:
  {{- if not .Values.autoscaling.enabled }}
  replicas: {{ .Values.replicaCount }}
  {{- end }}
  selector:
    matchLabels:
      {{- include "helm-experiments.selectorLabels" . | nindent 6 }}
  template:
    metadata:
      {{- with .Values.podAnnotations }}
      annotations:
        {{- toYaml . | nindent 8 }}
      {{- end }}
      labels:
        {{- include "helm-experiments.selectorLabels" . | nindent 8 }}
    spec:
      {{- with .Values.imagePullSecrets }}
      imagePullSecrets:
        {{- toYaml . | nindent 8 }}
      {{- end }}
      serviceAccountName: {{ include "helm-experiments.serviceAccountName" . }}
      securityContext:
        {{- toYaml .Values.podSecurityContext | nindent 8 }}
      containers:
        - name: {{ .Chart.Name }}
          securityContext:
            {{- toYaml .Values.securityContext | nindent 12 }}
          image: "{{ .Values.image.repository }}:{{ .Values.image.tag | default .Chart.AppVersion }}"
          imagePullPolicy: {{ .Values.image.pullPolicy }}
          ports:
            - name: http
              containerPort: 80
              protocol: TCP
          livenessProbe:
            httpGet:
              path: /
              port: http
          readinessProbe:
            httpGet:
              path: /
              port: http
          resources:
            {{- toYaml .Values.resources | nindent 12 }}
      {{- with .Values.nodeSelector }}
      nodeSelector:
        {{- toYaml . | nindent 8 }}
      {{- end }}
      {{- with .Values.affinity }}
      affinity:
        {{- toYaml . | nindent 8 }}
      {{- end }}
      {{- with .Values.tolerations }}
      tolerations:
        {{- toYaml . | nindent 8 }}
      {{- end }}

Again this is a bit much for our use case so let’s simplify, and replace the contents deployment manifest with the configuration below:

apiVersion: apps/v1
kind: Deployment
metadata:
  name: {{ .Release.Name }}-app
spec:
  replicas: {{ .Values.replicaCount }}
  selector:
    matchLabels:
      app: {{ .Release.Name }}-app
  template:
    metadata:
      labels:
        app: {{ .Release.Name }}-app
    spec:
      containers:
      - name: {{ .Chart.Name }}
        image: {{ .Values.image.repository }}:{{ .Values.image.tag }}
        ports:
        - containerPort: {{ .Values.service.port }}

In the updated manifest we are using Go template directives to inject values for the deployment name, container image, and ports:

The {{ .Release.Name }} template directive inserts the name of the Helm release. This ensures the deployment name is unique for each release of the chart.

For the container image we reference the repository and tag fields under the image key in values.yaml to set the container image dynamically.

Now let’s take a look at the service manifest helm generated, it should look something like this:

apiVersion: v1
kind: Service
metadata:
  name: {{ include "helm-experiments.fullname" . }}
  labels:
    {{- include "helm-experiments.labels" . | nindent 4 }}
spec:
  type: {{ .Values.service.type }}
  ports:
    - port: {{ .Values.service.port }}
      targetPort: http
      protocol: TCP
  selector:
    {{- include "helm-experiments.selectorLabels" . | nindent 4 }}

In the manifest above the {{ include }} directive references a named template,  .fullname inserts the full name including release name.

Similar to above, this includes a named labels and selector template defined elsewhere and indents it by 4 spaces. In our case we do not have any labels defined.

The Service type is dynamically based on the service.type value defined in values.yaml, the service port is set using the number in the values.yaml file, targetPort is set to HTTP(port 80)

Finally, you can deploy the helm chart to your local cluster by running:

 helm install helm-experiments .

Your output should be similar to:

Next, let’s verify resources were deployed correctly

Check the pods

kubectl get pods

We get two pods running just as we specified using the replicaCountvariable.

Check the service

kubectl get svc 

The service is also running with ClusterIP as specified in values.yaml

How to Host a Helm Chart

Currently we have our helm chart working locally, however the true power comes from the package system that allows it to be distributed and shared with other users, in this section we would take a look at the options available for hosting a helm chart.

Much like containers and code , helm charts are stored in repositories, these can be private or public depending on your use case.

For this demonstration we'll use ttl.sh to host our chart publicly. ttl.sh is a free anonymous container registry by the folks at Replicated, although ttl.sh is built for container images, we can leverage it for hosting Helm charts as well since they conform to the OCI (Open Container Initiative) image specification. This allows charts to be stored in compatible registries like Docker Hub, GCR, Docker Registry, Quay.io and ttl.sh.

Do note that ttl.sh is meant only for ephemeral hosting and testing purposes. The charts get automatically deleted after an hour this would suffice for local chart development

For production hosting, consider dedicated Helm repositories like ChartMuseum, Artifact Hub, or self-hosted solutions. The Helm Docs provide detailed guidance on different repository options.

We’ll begin by packaging our chart into a format we can push, to do this run the following command:

Package the Helm chart

 helm package .

The output should be similar to:

Push the Helm chart
With the chart packaged in a zip format we can push it to the registry

helm push helm-experiments-0.1.0.tgz oci://ttl.sh/helm-experiments

Your output should be similar to:

Note the CLI returns the location of our chart as ttl.sh/helm-experiments/helm-experiments:0.1.0

Install from the registry
Now we can test if the chart is indeed stored in the registry:

helm install helm-exp oci://ttl.sh/helm-experiments/helm-experiments

Using Helm for Deployments and Rollbacks

A rollback in Helm allows you to revert an upgraded release back to a previous revision.
Every time an install, upgrade, or rollback happens, Helm records the changed state as a new release revision with an incremented revision number. This gives a history of a release from creation through subsequent changes over its lifecycle.

If an upgrade results in issues, Helm rollbacks provide a safe, automated restore mechanism to go back to a known good release state using the revision history. to demonstrate let’s use the nginx helm chart.

Install Nginx
To install the nginx chart as a Helm release named my-nginx:

helm repo add bitnami https://charts.bitnami.com/bitnami
helm install my-nginx bitnami/nginx

Scale Replicas
Instead of a values file, we can use the --set flag to modify chart values. To scale up replicas:

helm upgrade --set replicaCount=3 my-nginx bitnami/nginx

Verify the pods where scaled:

kubectl get pods

Rollback Changes
If issues occur after upgrading, we can rollback, first lets view the helm deployment history:

helm history my-nginx

And we can rollback to the first deployment with the following command:

helm rollback my-nginx 1

After we performed a rollback the number of replicas has been scaled back down, this can be extremely useful in situations where there’s a bug in a specific version of an image or having multiple pods causes performance issues.

Verify the rollback with the following command:

kubectl get pods

Helm and CI/CD

Integrating Helm with CI/CD pipelines and GitOps workflows provides a major opportunity to automate application delivery and operations.

Teams can leverage Helm charts to enable continuous deployment pipelines that systematically promote application versions across environments right through to production.

Adopting GitOps practices where application releases are synced to version-controlled Helm charts will further empower developers through self-service deployment and rollback capabilities.

Tools like Argo CD can sync an application's state to Helm releases stored under version control in the Git repo.  Chances are you’re already using github actions, in which case you can leverage the helm chart relaser action to automate Helm releases.

When to Use Helm and When Not To

Helm is an extremely useful tool for deploying and managing Kubernetes applications. However, like all tools it is designed to solve specific problems and may not be the ideal choice in all scenarios, Helm excels when it comes to deploying complex applications with many components and managing their lifecycle

While extremely versatile, Helm may be overkill in some instances:

  • Standalone applications with very few supporting resources
  • Applications with relatively static configurations
  • When you just need visibility rather than full application management

Conclusion

From distributing static manifests to installing Helm charts, distributing Kubernetes applications has come a long way. In this article, we discussed how Helm solves the problem of Kubernetes application management as well as how to create and host your own Helm charts.

In the next article, we’ll explore some advanced features of Helm, dive deep into its architecture and discuss some strategies for debugging charts.

Like this article? Sign up for our newsletter below and become one of over 1000 subscribers who stay informed on the latest developments in the world of DevOps. Subscribe now!

KubernetesHelm

Jubril Oyetunji Twitter

Jubril is a software engineer, primarily focused on building infrastructure using cloud native technologies. When he’s not coding or ranting, he’s sharing his learnings through technical writing.